Adding recipients to your survey
This is a pilot feature with limited availability to pilot users only. For access, please reach out to support@upmetrics.com.
Intro to Contacts List
The contact list stores your global list of contacts that you’ll be interacting with as part of your impact portfolio reporting. You can add contacts to the contact list from the Outgoing surveys page. Only confirmed contacts from your contact list can be added as recipients to your individual surveys.
There are 2 ways you can add contacts to the contact list:
- Entering the contact details individually
- Importing a list of contacts through a CSV file
Entering the contact details individually
The Email and Organization values of the contact are used to determine if the organization and user account already exist in the UpMetrics application. Please make sure that they are entered accurately.
- From the Outgoing surveys page, click on Contact list → Add contact
- Under the Create tab, enter the details for your new contact.
- Click on Save contact to complete adding the contact.
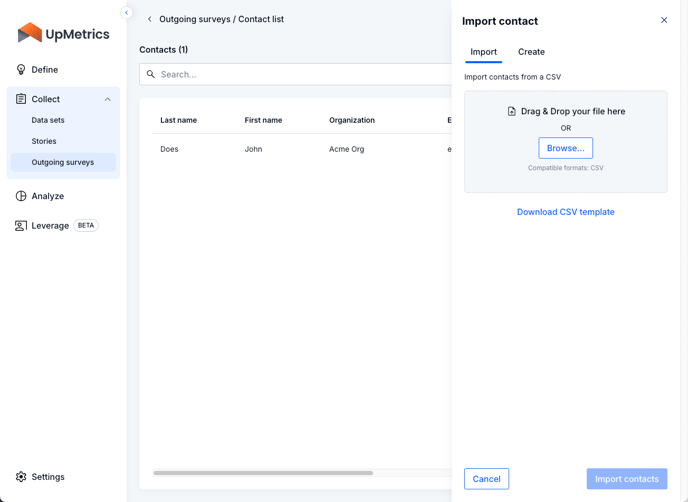
Importing a list of contacts through a CSV file
Please make sure that the values of the CSV are populated correctly to ensure that the import process is successful.
The following fields are required fields and must have values listed in the CSV: First name, Last name, Email, Organization.
- From the Outgoing surveys page, click on Contact list → Add contact
- Under the Import tab, click Download CSV template
- Populate the CSV template with the list of contacts you’d like imported.
- Drag & Drop the updated CSV file or Browse to select the updated CSV file.
- Click Import contacts.

CSV import requirements and troubleshooting
If your CSV import file is erroring out and you’re not quite sure why, please review and check the below to ensure they are corrected:
- Character count limits
- The First name, Last name, and Job title fields are limited to 100 characters. Any rows exceeding the character count limit will result in an error in the import process.
- The Additional Notes field is limited to 1000 characters. Any rows exceeding the character count limit will result in an error in the import process.
- Formatting of specific fields
- The Email field must be in valid email format i.e. “email@org.com” format. Any rows not showing the right email format will result in an error in the import process.
- Duplicate records
- If you try to import a contact that is already existing in your contact list, it will result in an error in the import process. Duplicates are recognized based on the Email field.
- Import limit
- You can import up to 200 rows of contacts per file. Please make sure to check your row counts!
A contact must be confirmed before it can be added as a recipient to your surveys.
Confirming contacts
When a contact has been added, the UpMetrics application will perform the necessary automation to ensure that the contact is confirmed. Only confirmed contacts can be added as recipients in your surveys. Non confirmed contacts will have a warning icon next to their email on the contact list.
For every contact that is created, there are 3 scenarios that it can fall in:
- The organization and user referenced in the contact does not exist in UpMetrics
- The organization referenced in the contact exists in UpMetrics, but the user does not exist in UpMetrics
- The organization and user referenced in the contact exist in UpMetrics
Scenario 1: The organization and user referenced in the contact does not exist in UpMetrics
In this scenario, the UpMetrics application will kick off a process to provision the new organization and new user:
- An email is sent to the contact, which will re-direct them to a UpMetrics page to confirm their details.
- Once confirmed, the organization will be created within UpMetrics and a new user account linked to that organization will be created. This user will be the first Organization admin for that organization within the UpMetrics application. Once this is completed, the contact will be confirmed.
- A second email is sent to the user for them to establish their password. They will be able to login to UpMetrics once they have established their password successfully.
Any edits to the first name, last name, or organization fields made by the user during the confirmation process will be reflected on the Contact list.
Scenario 2: The organization referenced in the contact exists in UpMetrics, but the user does not exist in UpMetrics
In this scenario, the UpMetrics application will add the new user to the existing organization within the application.
- An email is sent to the user for them to establish their password. They will be able to log in to UpMetrics once they have established their password successfully.
- Once this is completed, the contact will be confirmed.
Scenario 3: The organization and user referenced in the contact exist in UpMetrics
In this scenario, the contact is confirmed automatically.
The application will sync up the first name, and last name details for that user within the Contact list so that it matches with their existing user profile details.
Adding recipients to your surveys
Once you have a list of confirmed contacts, you may add them to your survey!
The Add recipient drawer will only list confirmed contacts from your contact list.
- Click on Outgoing surveys → Open your specific draft survey.
- Click on the Recipients tab.
- Click on Add recipient.

- In the Add recipient drawer, select the recipients you’d like to add.
- Click on Add recipients.
👏 Great work! Now you’ll be able to add contacts to your contact list, get them confirmed, and add them as recipients to your survey!

